semaphore mutex = 1; // Controls access to the reader count
semaphore db = 1; // Controls access to the database
int rdrCount; // The number of reading processes
public void Reader()
{
while (true) // loop forever
{
Wait(mutex); // gain access to rdrCount
rdrCount = rdrCount + 1; // increment the rdrCount
if (rdrCount == 1)
Wait(db); // if this is the first process to read the database,
// a Wait on db is executed to prevent access to the database by a Writer
Signal(mutex); // allow other processes to access rdrCount
read_db(); // read the database
Wait(mutex); // gain access to rdrCount
rdrCount = rdrCount - 1; // decrement rdrCount
if (rdrCount == 0)
Signal(db); // if there are no more processes reading from database, allow Writer
Signal(mutex); // allow other processes to access rdrCountuse_data();
// use the data read from the database (non-critical)
}
}
public void Writer()
{
while (true)
{ // loop forever
create_data(); // create data to enter into database (non-critical)
Wait(db); // gain access to the database
write_db(); // write information to the database
Signal(db); // release exclusive access to the database
}
}

ToolTip
Today I was trying to reuse xaml of a WPF in Silverlight 5 and came across this difference.
In Silverlight:
In WPF :
<TextBlock Text="{Binding FirstName}" ToolTip="{Binding FullName}"/>In Silverlight:
<TextBlock Text="{Binding FirstName}"> <ToolTipService.ToolTip> <ToolTip Content="{Binding FullName}"/> </ToolTipService.ToolTip> </TextBlock>Converter
Data Binding is one of the most power propery of WPF. Ex: Binding the background color of the TextBlock to the color that is selected in the ListBox. The following code adds a Background property to the TextBlock and uses the attribute binding syntax to bind to the value of the selected item in the ListBox:
In this example the a property of type string is our binding source object which is binded to the Color property? If there is a typo in the source object string or if we want to databind two properties that have incompatible types it will stop working.
Converts converter is a user defined class, which implements the IValueConverter interface. IvalueConverter provides a way to apply custom logic to a binding by implementing the Convert and ConvertBack methods. Converters can change data from one type to another, translate data based on cultural information, or modify other aspects of the presentation.
Convert(): The data binding engine calls this method when it propagates a value from the binding source to the binding target. A return value of DependencyProperty.UnsetValue indicates that the converter produced no value and that the binding uses the FallbackValue, if available, or the default value instead.
A return value of Binding.DoNothing indicates that the binding does not transfer the value or use the FallbackValue or default value.
ConvertBack(): The data binding engine calls this method when it propagates a value from the binding target to the binding source.
The implementation of this method must be the inverse of the Convert method.
A return value of DependencyProperty.UnsetValue indicates that the converter produced no value and that the binding uses the FallbackValue, if available, or the default value instead.
A return value of Binding.DoNothing indicates that the binding does not transfer the value or use the FallbackValue or default value.
I came across a requirement where the ListBox Height must change according to the Size of ListBox. In this example there is a ListBox with 10 Items and a Delete button which delete items from the ListBox. As the Item Count changes(here reduces) Height also changes.We can do this using Converters. The Height of the ListBox is binded with the ItemCount.
xaml
Converter
1. http://msdn.microsoft.com/en-us/magazine/cc163299.aspx
2. http://wpftutorial.net/ValueConverters.html
<TextBlock
    Width="248"
    Height="24"
    x:Name="tbSelectedColor"
    Text="{Binding ElementName=lbColor, Path=SelectedItem.Content,Mode=OneWay}"
    Background="{Binding ElementName=lbColor, Path=SelectedItem.Content,Mode=OneWay}"/>
In this example the a property of type string is our binding source object which is binded to the Color property? If there is a typo in the source object string or if we want to databind two properties that have incompatible types it will stop working.
Converts converter is a user defined class, which implements the IValueConverter interface. IvalueConverter provides a way to apply custom logic to a binding by implementing the Convert and ConvertBack methods. Converters can change data from one type to another, translate data based on cultural information, or modify other aspects of the presentation.
Convert(): The data binding engine calls this method when it propagates a value from the binding source to the binding target. A return value of DependencyProperty.UnsetValue indicates that the converter produced no value and that the binding uses the FallbackValue, if available, or the default value instead.
A return value of Binding.DoNothing indicates that the binding does not transfer the value or use the FallbackValue or default value.
ConvertBack(): The data binding engine calls this method when it propagates a value from the binding target to the binding source.
The implementation of this method must be the inverse of the Convert method.
A return value of DependencyProperty.UnsetValue indicates that the converter produced no value and that the binding uses the FallbackValue, if available, or the default value instead.
A return value of Binding.DoNothing indicates that the binding does not transfer the value or use the FallbackValue or default value.
I came across a requirement where the ListBox Height must change according to the Size of ListBox. In this example there is a ListBox with 10 Items and a Delete button which delete items from the ListBox. As the Item Count changes(here reduces) Height also changes.We can do this using Converters. The Height of the ListBox is binded with the ItemCount.
xaml
<Window x:Class="WpfConverters.MainWindow"
        xmlns="http://schemas.microsoft.com/winfx/2006/xaml/presentation"
        xmlns:x="http://schemas.microsoft.com/winfx/2006/xaml"
        xmlns:local="clr-namespace:WpfConverters"
        Title="MainWindow" Height="350" Width="525">
    <Window.Resources>
        <local:WidthConverter x:Key="converter"/>
    </Window.Resources>
    <Grid>
        <ListBox Name="personListBox" ItemsSource="{Binding PersonList}"
                 Margin="40,8,313,12" Width="150"
                 Height="{Binding Path=PersonList.Count, Converter={StaticResource converter}}">
            <ListBox.ItemTemplate>
                <DataTemplate>
                    <StackPanel>
                        <TextBlock Text="{Binding Name}"/>
                    </StackPanel>
                </DataTemplate>
            </ListBox.ItemTemplate>
        </ListBox>
        <Button Content="Delete" Height="23"
                HorizontalAlignment="Left" Margin="243,41,0,0"
                Name="DeleteButton" VerticalAlignment="Top" Width="75"
                Command="{Binding DeleteCommand}" CommandParameter="{Binding}"/>
    </Grid>
</Window>
Converter
using System;
using System.Collections.Generic;
using System.Linq;
using System.Text;
using System.Windows.Data;
using System.Collections.ObjectModel;

namespace WpfConverters
{
    class WidthConverter : IValueConverter
    {
        public object Convert(object value, Type targetType, object parameter, System.Globalization.CultureInfo culture)
        {
            var listCount = value as int?;
            if (listCount.HasValue)
            {
                if (listCount == 0)
                    return 10;
                else if (listCount < 2)
                    return 100;
                else if (listCount >= 3)
                    return 200;
                else if (listCount >= 5)
                    return 250;
            }
            return 400;
        }

        public object ConvertBack(object value, Type targetType, object parameter, System.Globalization.CultureInfo culture)
        {
            throw new NotImplementedException();
        }
    }
}
using System;
using System.Collections.Generic;
using System.Linq;
using System.Text;
using System.ComponentModel;
using System.Collections.ObjectModel;
using System.Windows.Input;

namespace WpfConverters
{
    public class ViewModel : INotifyPropertyChanged
    {
        public ICommand DeleteCommand { get; private set; }
        public ViewModel()
        {
            PersonList = new ObservableCollection<Person>();
            PersonList.Add(cust1);
            PersonList.Add(cust2);
            PersonList.Add(cust3);
            PersonList.Add(cust4);
            PersonList.Add(cust5);
            PersonList.Add(cust6);
            PersonList.Add(cust7);
            PersonList.Add(cust8);
            DeleteCommand = new RelayCommand(ExecuteDeleteCommand, CanExecuteDeleteCommand);
        }

        Person cust1 = new Person() { Name = "Alice", Age = 20 };
        Person cust2 = new Person() { Name = "Bob", Age = 21 };
        Person cust3 = new Person() { Name = "Mark", Age = 22 };
        Person cust4 = new Person() { Name = "Jay", Age = 23 };
        Person cust5 = new Person() { Name = "Mike", Age = 23 };
        Person cust6 = new Person() { Name = "Linda", Age = 22 };
        Person cust7 = new Person() { Name = "Maya", Age = 21 };
        Person cust8 = new Person() { Name = "Susan", Age = 20 };

        ObservableCollection<Person> personList;

        public ObservableCollection<Person> PersonList
        {
            get { return personList; }
            set { personList = value; OnPropertyChanged("PersonList"); }
        }

        public void ExecuteDeleteCommand(object parameter)
        {
            PersonList.Remove(PersonList.LastOrDefault());
        }

        public bool CanExecuteDeleteCommand(object parameter)
        {
            if (personList.Count == 0)
                return false;
            else
                return true;
        }

        public event PropertyChangedEventHandler PropertyChanged;

        protected void OnPropertyChanged(string propertyName)
        {
            if (null != PropertyChanged)
                PropertyChanged(this, new PropertyChangedEventArgs(propertyName));
        }
    }
}
using System;
using System.Collections.Generic;
using System.Linq;
using System.Text;

namespace WpfConverters
{
   public class Person
    {
        string name;
        public string Name
        {
            get { return name; }
            set { name = value; }
        }

        int age;
        public int Age
        {
            get { return age; }
            set { age = value; }
        }
    }
}
1. http://msdn.microsoft.com/en-us/magazine/cc163299.aspx
2. http://wpftutorial.net/ValueConverters.html
C# Interface
We have two Classes ClassOne & ClassTwo and two interfaces InterfaceOne and InterfaceTwo.
Is this code valid?
Ans: Base class must come before interface.
Is this code valid?
interface InterfaceOne

    {

        void InterfaceOneMethod();

    }


    interface InterfaceTwo

    {

        void InterfaceTwoMethod();

    }


    class ClassOne :  InterfaceOne, ClassTwo

    {

        public void InterfaceOneMethod()

        {

            //Some Code

        }

    }


    class ClassTwo

    {

    }
Ans: Base class must come before interface.
class ClassOne :   ClassTwo, InterfaceOne

    {

        public void InterfaceOneMethod()

        {

            //Some Code

        }

    }
WinForm Interview Question(C#)
Q. There is a WinForm(Form1) with a Button(Open Form2). If the user clicks the button it should open another WinForm(Form2). If the user again click on the Button in Form1, he should get a message saying that Form2 is already open.
Ans: In Form1's Button click event add this code.
Ans: In Form1's Button click event add this code.
 private void Form1Bttn_Click(object sender, EventArgs e)

        {

            bool FormOpen = false;


            //Application.OpenForms propety: Gets a collection of open forms

            //owned by the application.

            foreach (Form S in Application.OpenForms)

            {

                if (S is Form2)

                {

                    FormOpen = true;

                }

            }


            if (FormOpen == true)

            {

                MessageBox.Show("Form already open.");

            }


            else

            {

                Form MyForm = new Form2();

                MyForm.Show();

            }

        }
Alternating Rows in an ItemsControl
We can give different styles to each row in a Control which uses ItemControl for representing a collection of Items.
The AlternationCount and ItemsControl.AlternationIndex properties of Itemcontrol class enable the user to specify the appearance for two or more alternating item containers.
The AlternationCount is the number of rows that form a sequence. If AlternationCount is set to 1, the list will alternate after every item.
Each Item(here DataGridItem) have an ItemsControl.AlternationIndex which allow the user to determine how it is numbered in the sequence. ItemsControl.AlternationIndex begins at 0, increments until it is (AlternationCount - 1), and then restarts at 0. So if the AlternationCount is 2 we can apply style to 2 Items(First Items's AlternationIndex =0, Second Item's AlternationIndex =1 and Third Item's AlternationIndex = 0, ie it will reset.)

Refrence:http://msdn.microsoft.com/en-us/library/system.windows.controls.itemscontrol.alternationcount.aspx
The AlternationCount and ItemsControl.AlternationIndex properties of Itemcontrol class enable the user to specify the appearance for two or more alternating item containers.
The AlternationCount is the number of rows that form a sequence. If AlternationCount is set to 1, the list will alternate after every item.
Each Item(here DataGridItem) have an ItemsControl.AlternationIndex which allow the user to determine how it is numbered in the sequence. ItemsControl.AlternationIndex begins at 0, increments until it is (AlternationCount - 1), and then restarts at 0. So if the AlternationCount is 2 we can apply style to 2 Items(First Items's AlternationIndex =0, Second Item's AlternationIndex =1 and Third Item's AlternationIndex = 0, ie it will reset.)
   <Window.Resources>
        <Style TargetType="{x:Type DataGridRow}">
            <Style.Triggers>
                <Trigger Property="ItemsControl.AlternationIndex" Value="0">
                    <Setter Property="Background" Value="AntiqueWhite"/>
                </Trigger>
                <Trigger Property="ItemsControl.AlternationIndex" Value="1">
                    <Setter Property="Background" Value="PaleGoldenrod"/>
                </Trigger>
                <Trigger Property="ItemsControl.AlternationIndex" Value="2">
                    <Setter Property="Background" Value="Lavender"/>
                </Trigger>
                <Trigger Property="ItemsControl.AlternationIndex" Value="3">
                    <Setter Property="Background" Value="Pink"/>
                </Trigger>
            </Style.Triggers>
        </Style>
    </Window.Resources>
    <Grid>
        <DataGrid x:Name="GridViewNames" AlternationCount="4">
            <DataGrid.ItemTemplate>
                <DataTemplate>
                    <StackPanel>
                        <TextBlock Text="{Binding Path=FistName}"/>
                        <TextBlock Text="{Binding Path=LastName}"/>
                    </StackPanel>
                </DataTemplate>
            </DataGrid.ItemTemplate>
        </DataGrid>
    </Grid>

Refrence:http://msdn.microsoft.com/en-us/library/system.windows.controls.itemscontrol.alternationcount.aspx
WPF Brushes
In WPF everything is visible because it is painted with Brush.Brushes enable the user to paint user interface (UI) controls with anything from simple, solid colors to complex sets of patterns and images.A brush is used to describe background of a button, the foreground of text(font color), and the filling color of the shape.
A Brush "paints" an area with its output. Different brushes have different types of output. Brushes can paint an area with a solid color/with a gradient/pattern/ image/ drawing.
There are diffenrent types of Brushes.

LinearGradientBrush: paints an area with a linear gradient. A linear gradient blends two or more colors across a line, the gradient axis. Use GradientStop objects to specify the colors in the gradient and their positions.
The default linear gradient is diagonal. In the default, the StartPoint of a linear gradient is (0,0), the upper-left corner of the area being painted, and its EndPoint is (1,1), the lower-right corner of the area being painted. The colors in the resulting gradient are interpolated along the diagonal path. If we want to the linear gradient Horizontal, set the StartPoint="0,0" and EndPoint="0,1" and for Vertical gradient StartPoint="0,0" and EndPoint="1,0"(Refresh X-Y Cartesian Coordinate System you learned in high school math class.:)) -

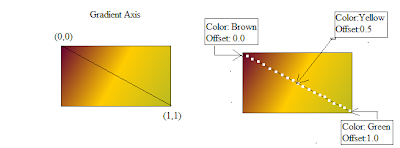
A line was added to highlight the interpolation path of the gradient from the start point to the end point.

RadialGradientBrush: paints an area with a radial gradient. A radial gradient blends two or more colors across a circle.

ImageBrush: paints an area with a ImageSource.

References: http://msdn.microsoft.com/en-us/library/system.windows.media.brush.aspx
A Brush "paints" an area with its output. Different brushes have different types of output. Brushes can paint an area with a solid color/with a gradient/pattern/ image/ drawing.
There are diffenrent types of Brushes.
- SolidColorBrush
- LinearGradientBrush
- RadialGradientBrush
- ImageBrush

<Ellipse Stroke="Black" StrokeThickness="2" Margin="35,130,435,324">
            <Ellipse.Fill>
                <SolidColorBrush Color="DarkOrange"></SolidColorBrush>
            </Ellipse.Fill>
        </Ellipse>
        <Label Content="SolidColorBrush" Height="30"
               HorizontalAlignment="Left" Margin="35,80,0,0"
               Name="SolidColorBrushLabel" VerticalAlignment="Top"
               Width="100" Background="DarkOrange"/>
LinearGradientBrush: paints an area with a linear gradient. A linear gradient blends two or more colors across a line, the gradient axis. Use GradientStop objects to specify the colors in the gradient and their positions.
The default linear gradient is diagonal. In the default, the StartPoint of a linear gradient is (0,0), the upper-left corner of the area being painted, and its EndPoint is (1,1), the lower-right corner of the area being painted. The colors in the resulting gradient are interpolated along the diagonal path. If we want to the linear gradient Horizontal, set the StartPoint="0,0" and EndPoint="0,1" and for Vertical gradient StartPoint="0,0" and EndPoint="1,0"(Refresh X-Y Cartesian Coordinate System you learned in high school math class.:)) -


A line was added to highlight the interpolation path of the gradient from the start point to the end point.

<Grid>
    <Rectangle Height="100" HorizontalAlignment="Left"
                   Margin="55,125,0,0" Name="LinearGradientBrushRectangle"
                   Stroke="Black" VerticalAlignment="Top" Width="180" >
            <Rectangle.Fill>
                <LinearGradientBrush>
                    <GradientStop Color="#660033" Offset="0.0" />
                    <GradientStop Color="#FFCC00" Offset="0.5" />
                    <GradientStop Color="#BABA21" Offset="1" />
                </LinearGradientBrush>
            </Rectangle.Fill>
        </Rectangle>
        <Label Content="LinearGradientBrush " Height="30"
               HorizontalAlignment="Left" Margin="70,70,0,0"
               Name="LinearGradientBrushLabel" VerticalAlignment="Top" >
            <Label.Background>
                <LinearGradientBrush>
                    <GradientStop Color="#660033" Offset="0.0" />
                    <GradientStop Color="#FFCC00" Offset="0.5" />
                    <GradientStop Color="#BABA21" Offset="1" />
                </LinearGradientBrush>
            </Label.Background>
        </Label>
    </Grid>
RadialGradientBrush: paints an area with a radial gradient. A radial gradient blends two or more colors across a circle.

    <Grid>
        <Polygon Points="300,200 400,125 400,275 300,200" Margin="-183,-12,161,12">
            <Polygon.Fill>
                <RadialGradientBrush GradientOrigin="0.5,0.5">
                    <GradientStop Color="  #800080" Offset="0"/>
                    <GradientStop Color="Sienna" Offset="0.5"/>
                    <GradientStop Color="#4AA02C" Offset="1">
                    </GradientStop>
                </RadialGradientBrush>
            </Polygon.Fill>
        </Polygon>
        <Label Content="RadialGradientBrush " Height="30" HorizontalAlignment="Left" Margin="138,76,0,0" Name="RadialGradientBrushLabel" VerticalAlignment="Top" >
            <Label.Background>
                <RadialGradientBrush GradientOrigin="0.5,.7">
                    <GradientStop Color="  #800080" Offset="0"/>
                    <GradientStop Color="Sienna" Offset="0.5"/>
                    <GradientStop Color="#4AA02C" Offset="1"/>
                    </RadialGradientBrush>
            </Label.Background>
        </Label>
    </Grid>
ImageBrush: paints an area with a ImageSource.

<Grid>
        <Label Content="ImageBrush" Height="30"
               HorizontalAlignment="Left" Margin="129,47,0,0"
               Name="ImageBrushLabel" VerticalAlignment="Top"
               FontWeight="Bold"  >
            <Label.Background>
                <ImageBrush Viewbox="0.6,0.3,0.6,0.7" ImageSource="Image\ImageBrush.png"/>
            </Label.Background>
        </Label>
        <Ellipse Height="80" HorizontalAlignment="Left"
                 Margin="95,101,0,0" Name="ImageBrushEllipse"
                 Stroke="Black" VerticalAlignment="Top" Width="145" >
            <Ellipse.Fill>
                <ImageBrush ImageSource="Image\ImageBrush.png"/>
            </Ellipse.Fill>
        </Ellipse>
    </Grid>
References: http://msdn.microsoft.com/en-us/library/system.windows.media.brush.aspx
Subscribe to:
Posts (Atom)